Mountain biking in snow and ice

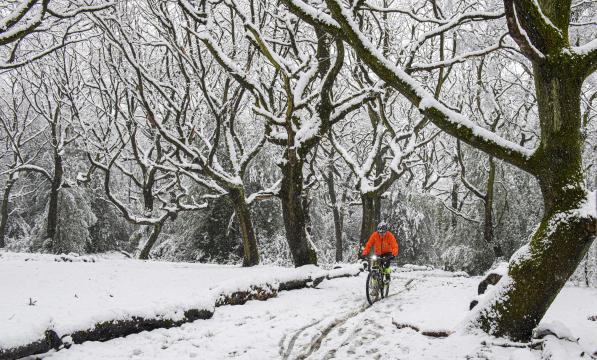
With the onset of winter, you can encounter some truly fantastic environments on your bike. Despite the ice and the heightened risk of slips and crashes, riding in the snow is quite safe (as you are travelling slowly and there are lots of drifts to fall into) and most of all, it’s fun!
Like anything new, there is a bit of working out how to do it, so you feel comfortable. Firstly, you have to get out there and try it.
In the meantime, here are a few tips from Cycling UK's training manager Ross Adams to help you ride safely in the white stuff and have some fun.
Preparation
Slow down
When planning your ride, remember winter riding is often slower, those hard packed singletrack ribbons of bliss may have been replaced by snowy / muddy / icy sniper trails waiting to catch you off guard. Slowing down and not getting involved in any Strava shenanigans will be your friend and keep you rubber side down, a case of tortoise over hare.
Be flexible
It’s also worth considering that If conditions do change for the worse during your ride, don’t be afraid to be flexible and alter your plans to cut your route short or avoid particularly hazardous trails.
Consider making the route less challenging in extreme winter conditions, that techy climb or descent can become unrideable in snow and ice. Keeping your momentum by using gentler climbs and flowing descents will keep you rolling, maintain your core temperature, and minimise the risk of having an impromptu dismount!
Let people know where you are
As with any ride, tell someone where you are going, share your intended route, expected time you’ll finish and what to do if you don’t return by an agreed time. If your intended route changes, update your base contact of those changes, and check in with them once you have returned.
This is always good practise for any ride but becomes even more prevalent in winter conditions.
Check your lights
Daylight can be a rare commodity during the winter months, and associated weather in the hills can change very quickly, so charge those lights in good time, even if you don’t use them, getting in the habit of keeping them charged and with you will serve you well for that one time when they’re inevitably needed.
Know the weather
Check the forecast for the area you’re planning your ride, use a mountain forecast to get more detailed information, including air temperature but more importantly wind temperature, this time of year wind chill can be more of a factor when considering how cold it’ll feel.

Clothing
Now that you’ve checked the weather, its time to plan your outfit accordingly.
Know your body, I tend to ‘ride warm’ so I know once I generate body heat, I can retain it. However, my extremities can be affected; I personally concentrate on the fingers and toes. Work out what works for you and plan your wardrobe accordingly.
Layering your clothing
As mentioned above though, you’ll be riding slower, however if the white stuff has made an appearance you’ll be working hard and not carrying as much momentum along the trail, so layering your clothing is the trick as you can regulate your body temperature more easily. Start with a close fitting base layer, followed by your usual riding jersey; a gillet can be a good option as it can be easily removed and packed away and don’t forget the top layer of a wind/waterproof jacket; again, if this can be packable, then it gives you further options to add and remove as the temperature changes.
With the advent of riding trousers, these can be a better alternative to the traditional bib tights and baggies combo. There’s plenty of brands at a range of prices now filtering through, so you should be able to find something that fits your budget.
Hands and feet
Now for those pinkies and tootsies, those summer gloves and thin socks just aren’t going to cut it once the temperature plummets and the snowmen make an appearance, and nothing can ruin a winter ride quicker than freezing hands and feet.
Layering again can be your friend for your feet, wear two pair of thin socks rather than reaching for one pair of thick socks, if you can invest in some winter cycling boots, or overshoes to keep the wind off and (as much as possible) the snow out. Even walking boots and flat pedals work well. Whichever shoes you wear, grippy, knobbed soles are essential, when you inevitably have to walk at some point.
We all like the feel of bars and grips giving us trail feedback, but this time of year it’s time to trade that feedback for warm hands; treat yourself to some winter gloves, look for wind and waterproof options; cold and wet hands don’t equate to a safe or enjoyable ride.
Ears and eyes
Also, at this time of year those other extremities that keep your glasses in place can become painfully sore when hit with the wind chill. Use a thin skull cap hat or bandana under your helmet to keep your head and ears warm. If you don’t usually wear glasses, now is the time to seriously consider them, the cold air can really affect your eyes and vision too.
Equipment
Tyres
Most knobbly tyres still work in snow, but reducing the pressure by just a few psi will aid grip, just don’t go too low as you’re more susceptible to pinch flats. I find that high piked tyres such as Maxxis Wetscreams are a great winter option, however If you do want a more specific snow and ice tyre, you can buy studded tyres, these are great on ice, but very sketchy on tarmac, so beware where and how you ride them on the black stuff.
Emergency equipment and food
Between your party, you should also take some extra emergency equipment, like a plastic bivvy bag and/or group shelter if you have one, foil blankets are also a great idea to take on any ride, but even more important for a winter ride. These are readily available, affordable, and easy to carry.
Take some food with you. You'll need it to both deal with the additional energy demands of riding in snow, and to keep you warm. Keeping hydrated is still vital, even when the temperature plummets. It may be cold, but it’s still essential to drink plenty of water, you might be thirsting after a cup of hot brown, but your body still requires water even if it is -3c, so remember to keep hydrated to maintain energy.
Your bike
Don't expect your bike to work like it does on a hot, dry day. Your chain, cassette, shifters and mechs may freeze up, so you may well end up leaving it in a single sprocket, find one that you can spin and stick with it if this happens. If things worsen, stop, and manipulate the gears and shifters whilst off the bike to get things moving again.
Cold temperatures can affect suspension components too. The settings that feel so 'dialled in' during the summer might seem completely off during the winter. Oil thickens, air pressure decreases, and friction increases between sliding parts.
The first thing to do is double check the air pressure in your forks and set sag or pump up the fork/shock to their summer pressures. Consider opening compression and rebound a couple of clicks, but keep in mind, if the temperatures of the dampers increase on longer, rougher descents, damping will become faster. The same goes for if the outside temperature increases throughout the ride.

Riding skills
Hone your riding skills, reaction times and balance by riding in snow. Certain conditions are grippier than velcro, others are more slippery than a banana skin. Learn to read the conditions and anticipate early. Slamming on the anchors is likely to end in tears.
Head for firm snow. Slush is terrible, deep stuff unrideable, and ice feels scary. The best stuff is that where a handful of people or vehicles have travelled your route previously, creating a firm, smooth line. Where the deep stuff is soft and fluffy, then it can still be quite rideable, as long as you get down to a firm base, keep a straight line as much as possible, and keep an eye out for surface changes, hold your line by moving your upper body from side to side to keep your bike tracking. Drop your heels and keep your weight back help to maintain traction on your rear wheel, or to stop the front wheel diving when you’re descending.
Look for colour and texture changes to the snow surface to anticipate where the grip might change. Shiny or clear surfaces that can even look wet indicate slippery ice, whereas a deep white or translucence indicates good grip, especially where the ice has some texture to it.
Keep your eyes peeled for other indicators like sections that have frozen after melting the previous day, these usually smooth out and make it quite treacherous. Where you do see a change in surface, or suspect some ice imminently, make sure that you brake beforehand rather than on the ice - if it helps your confidence then clip out. Most importantly don't pedal, brake, or steer - keep your weight evenly balanced, and crucially, relax. Then you'll come out the other side upright and ready to ride the rest of the day.
In general, do everything gently; big pedal strokes end up in wheelspin; harsh braking in slides. Use your whole pedal stroke to apply power smoothly, steer a little bit rather than setting up sharp corners.
So, get out there and make the most of the conditions. In the same way night riding changes the feel of your local trails, riding in the snow generates a completely different look, feel and challenge to your local area. Consider riding from your door and reduce the traffic demands on the already pressured roads. We promise, you'll never have enjoyed your local trails as much!


